
Creating a website for your business or blog can seem like a daunting task but let’s be honest, if you don’t have a website you aren’t going to get very far in your business.
If fact you’re probably better off not telling anyone about your business until you do have a website up as it will negatively effect the potential customer, or client’s, opinion of you if you don’t have a website
Unfortunately to create a good website, a developer is likely to set you back thousands (I should know I am one 😉 ) and I know how tight money can be when first starting a business. Especially if it’s a passion project.
Paying someone to create your website is likely just not an option for you at this moment in time. But that’s not a problem; you can create your very own website for your business yourself without any coding or technical knowledge.
That’s what I’m going to take you through in this blog post; everything you need to know to build your very own website in the best way possible so that it will be able to grow with your business over the years. This is a long post so I’ve created an index below of all of the sections. We’re going to look at the options of platforms you could use for creating your website first and I do spend a little time on this as it’s important you understand the decision otherwise any time “Sally” or “Bill” or “Fred” voices their uninformed opinion and says “oh you should be using x” you’ll second guess yourself which will slow down your progress. And our aim is to get your website launched as quickly as possible.
If you want to jump to any sections in particular just click on one of the links below and it will take you there:
The Ultimate Guide to Creating a Website for your Business
Step 1: Choose the Platform You’re Going to Use to Create Your Website
Step 3: Set Up Your Website Hosting
Step 7: Set Up Your Core Site Pages
Step 1: Choose the Platform You’re Going to Use to Create Your Website
There are lots of different platforms you can use to build your website, many of which you’ve probably heard of such as Wix, Squarespace, WordPress, Blogger, Weebly etc.
And choosing the wrong one can cause active harm to you business.
The biggest two at the moment are WordPress and Squarespace.
If you’re part of any entrepreneur or blogger groups on Facebook you’ve probably heard a lot of people recommend Squarespace as:
- It’s really easy to use
- The designs of the templates are appealing
- It won’t take long to get a website live using it
And that is all true. But the downsides of using it far outweigh the benefits.
Setting up a website in Squarespace (or Wix) for that matter, means that you don’t really own your website, it’s much more like renting a house than owning it. Given this is your business’s home online you really want to make sure you own this space and don’t just rent it.
With platforms like Squarespace, Wix and even WordPress.com you get:
- Very limited customization
- Minimal additional tools so you miss out on things like SEO add ons, website speed optimisers, pop ups to collect email addresses and social sharing buttons to name a few
- No monetisation – and, yes you do want that
- Your website is trapped into their platform
This last point is by far the most important to me, if you were to ever want to change platform you can’t just pull off all your files and go somewhere else, you’ll have to re –build the whole thing. Which may not seem too bad now but think what that might be like once you’ve created lots of pages and blog posts for your site.
It’s a complete and utter pain in the ass, believe me I’ve had to do it.
So what platform do I recommend you use? WordPress.org a thousand times over
Now when I was first told I should use WordPress.org it sounded a little scary to be honest. Just the fact that the name had .org on the end of it made me think it was just for techies and that I would end up with a .org url for my business as a result and I wanted a .com one.
Plus I was extremely confused since I already had some websites live on WordPress.com so I didn’t really get why there was this other company that kinda had the same name.
Well, one of the founders is the same across both companies, hence the name situation, but they are two completely separate companies. And the functionality for a website build on WordPress.com vs WordPress.org is completely different. WordPress.org is the one that lets your own your business’s home online. With WordPress.org all your files and content are yours and if you were to ever want to go elsewhere you would just pull them off and walk away.
And you can still get a .com domain. In fact that’s the next step we’re going to go onto now.
(I know it might be tempting to run of and start looking at the WordPress.org website right now but setting up your website will be much easier if you just follow the below steps one-by-one. Stay with me. We got this.)
PSST...Get Your FREE Website Launch Checklist Now
Click below to subscribe to my newsletter and get FREE instant access to your very own site launch checklist. Make sure you don't miss any of the steps and download it now
Privacy Policy
Step 2: Buy Your domain
This is the address of your site. There are lots of different providers you can use to buy your domain from but I personally always use GoDaddy to buy my domains.
Whichever provider you choose to use to purchase your domain, if you’re going to have more than one website or bog I would recommend buying them all through the same provider for simplicity.
Head to GoDaddy now to get your domain and we’ll move onto Step 3.
Bonus: Pro Tips for Choosing Your Domain Name
- Make sure it is a .com url
- Pick something easy to remember
- Don’t use hyphens
Step 3: Set Up Your Website Hosting
Your website will need hosting as this is where all your files and content on your website are stored.
You want the hosting to be fast as that makes Google like you (and we all want Google to like us) and easy to use when just staring out therefore I recommend using Bluehost for this.
There are faster hosting providers out there but Bluehost is by far the best value for money and has excellent customer support so if you ever get stuck on anything you can just give them a call 24/7 and they will talk you through whatever you need (I don’t recommend using the live chat, stick with calling). That’s really important when you’re just starting out.
Click here to set up your Bluehost hosting now.
PSST...Get Your FREE Website Launch Checklist Now
Click below to subscribe to my newsletter and get FREE instant access to your very own site launch checklist. Make sure you don't miss any of the steps and download it now
Privacy Policy
Pro Tip: Linking Your Domain and Hosting
I recommend buying your domain separately to your hosting as then it’s easier for you to change your hosting if you ever wanted to in the future. It’s not a good idea to put all your eggs in one basket, even though you could get a free domain with your Bluehost account.
If you follow my advice, which you should obviously ????, there is one additional step you will need to take. This is that you will need to update the namesservers to prove to Bluehost you’re the owner of that domain. I know that sounds scary complicated but don’t worry it will take you 2 minutes tops.
When you set up your account with Bluehost using your GoDaddy domain you’ll get a message saying the below

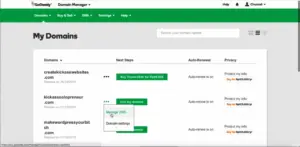
To update this, go into your GoDaddy account and go to “Domains”. You will then get a screen like the below. Click on the 3 little dots and hit “Manage DNS”
Then scroll down to where it says Nameservers and select custom as per the below image.
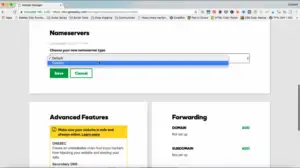
Two boxes will appear and this is where you enter the NS1.BLUEHOST.COM and NS2.BLUEHOST.COM text as you can see below.
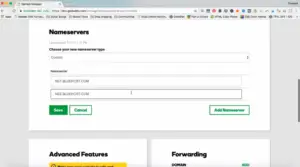
Hit save and you’re all done. See told ya it wouldn’t be that bad ????
Step 4: Install WordPress
Bluehost have now made this so incredibly simple as they realize most people are using WordPress with their hosting so they now auto install it for you when you sign up. Woohoooooo ???????? (that’s me celebrating for you).
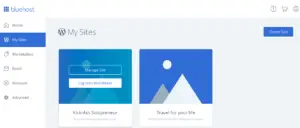
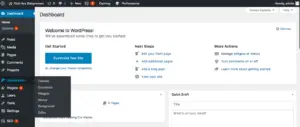
You’ll just have the one site in your account at this moment in time so where you see it says “My Sites” in the image below there will just be one square underneath which will be for your very own WordPress site. If you hover over that you’ll see the option to Log in to WordPress. Click there and you’ll be taken straight to the backend of your website so you can get started on making it look how you want.
Pro Tip: How to Log into WordPress Going Forward
The above details how you log into WordPress the first time after you install your hosting. You can also click on manage site here and check what your user name and password is for future reference.
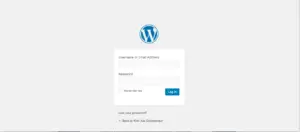
Going forward any time you want to log in to your website just type in yourdomain.com/wp-admin (and I do mean your actual domain not literally “yourdomain”) and you will be taken to the page shown in the image below where you can put in your log in details.
PSST...Get Your FREE Website Launch Checklist Now
Click below to subscribe to my newsletter and get FREE instant access to your very own site launch checklist. Make sure you don't miss any of the steps and download it now
Privacy Policy
Step 5: Choose Your Theme
The look and feel of all websites on WordPress is determined by the theme that you choose for your website.
You can set the theme for your site by clicking on appearance and then themes as shown below.
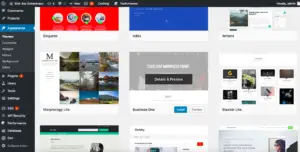
Once in the themes are you can then click “Add New” and scroll through the different options available to find one you like the look of.
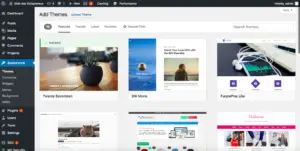
When you click one which appeals to you, there will be a choice to preview how it looks or to install it. I suggest looking at the preview first.
PSST...Get Your FREE Website Launch Checklist Now
Click below to subscribe to my newsletter and get FREE instant access to your very own site launch checklist. Make sure you don't miss any of the steps and download it now
Privacy Policy
Pro Tip: If the Theme Doesn’t Look How You Expected
This can be frustrating experience as so many of the themes look beautiful in the previews but then when you install them for yourself, or worse buy them, they end up looking nothing like they looked in the preview. To overcome this :
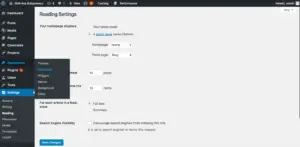
1.Check whether your homepage is set to display a static home page or your latest blog posts
What I mean by this is that either your homepage can be a page with content on that is always the same and just displays what you put on the page called “Home” or it can be a dynamic page which will automatically update to pull through the latest blog posts that you add to your site. If you want your homepage to be more like a newsfeed of the latest things you’ve written then you would want to have the homepage set to display your latest blog posts. If you want it to display the same information about your business anytime someone visits the site then you’d want to make it a static page. To change this setting got to “Settings” then “Reading” and as you can see in the below image this is the first setting that can be changed on that page. This is also where you can select which pages will be used to show your homepage and blog. I just don’t even want to admit how long it took me to work out this setting needed to be changed.
2. Choose a better theme
I may sound like captain obvious right now but which theme you choose will make all the difference in how easy it is for you to get your site to look exactly as you would like it to. A lot of themes are stupidly difficult to get to look like the previews and even once you do they then have customization limits which can leave you with setting you don’t want. No matter what you want your site to look like there is one theme that will ensure you can do whatever you want with it, and that is Divi. I use Divi to build all my own websites and to develop client websites from. My websites look wildly different to each other, but they’re all built using Divi.
Step 6: Customize Your Theme
Once you’ve got your theme installed you’re going to want to customize it to make it look right for our business.
To customize your theme go into appearance and then customize, as shown below, and from here you can change any setting you might need to.
Note: Most WordPress themes have set page layouts for those themes so whilst you can change the colors and things in the customizer you won’t be able to change the actual page structure. Unless you use Divi that is, Divi allows you to make the structure of every single page of your website different if you so desire.
Step 7: Set Up Your Core Site Pages
For a service based business there are usually 5 key pages you should set up for your website. These are:
- Home
- About
- Services
- Blog
- Contact
If you’re setting up your website to write a blog, rather than to launch your business, you’ll likely want to create most of the same pages but change the services page. The others will all still be relevant though so you can get everything set up quickly to start making money from your blog.
PSST...Get Your FREE Website Launch Checklist Now
Click below to subscribe to my newsletter and get FREE instant access to your very own site launch checklist. Make sure you don't miss any of the steps and download it now
Privacy Policy
Phew that was long but congratulations, you now have everything set up from which to build your website.